Documentation - ArchViz Explorer for Unreal Engine 4

FAQ

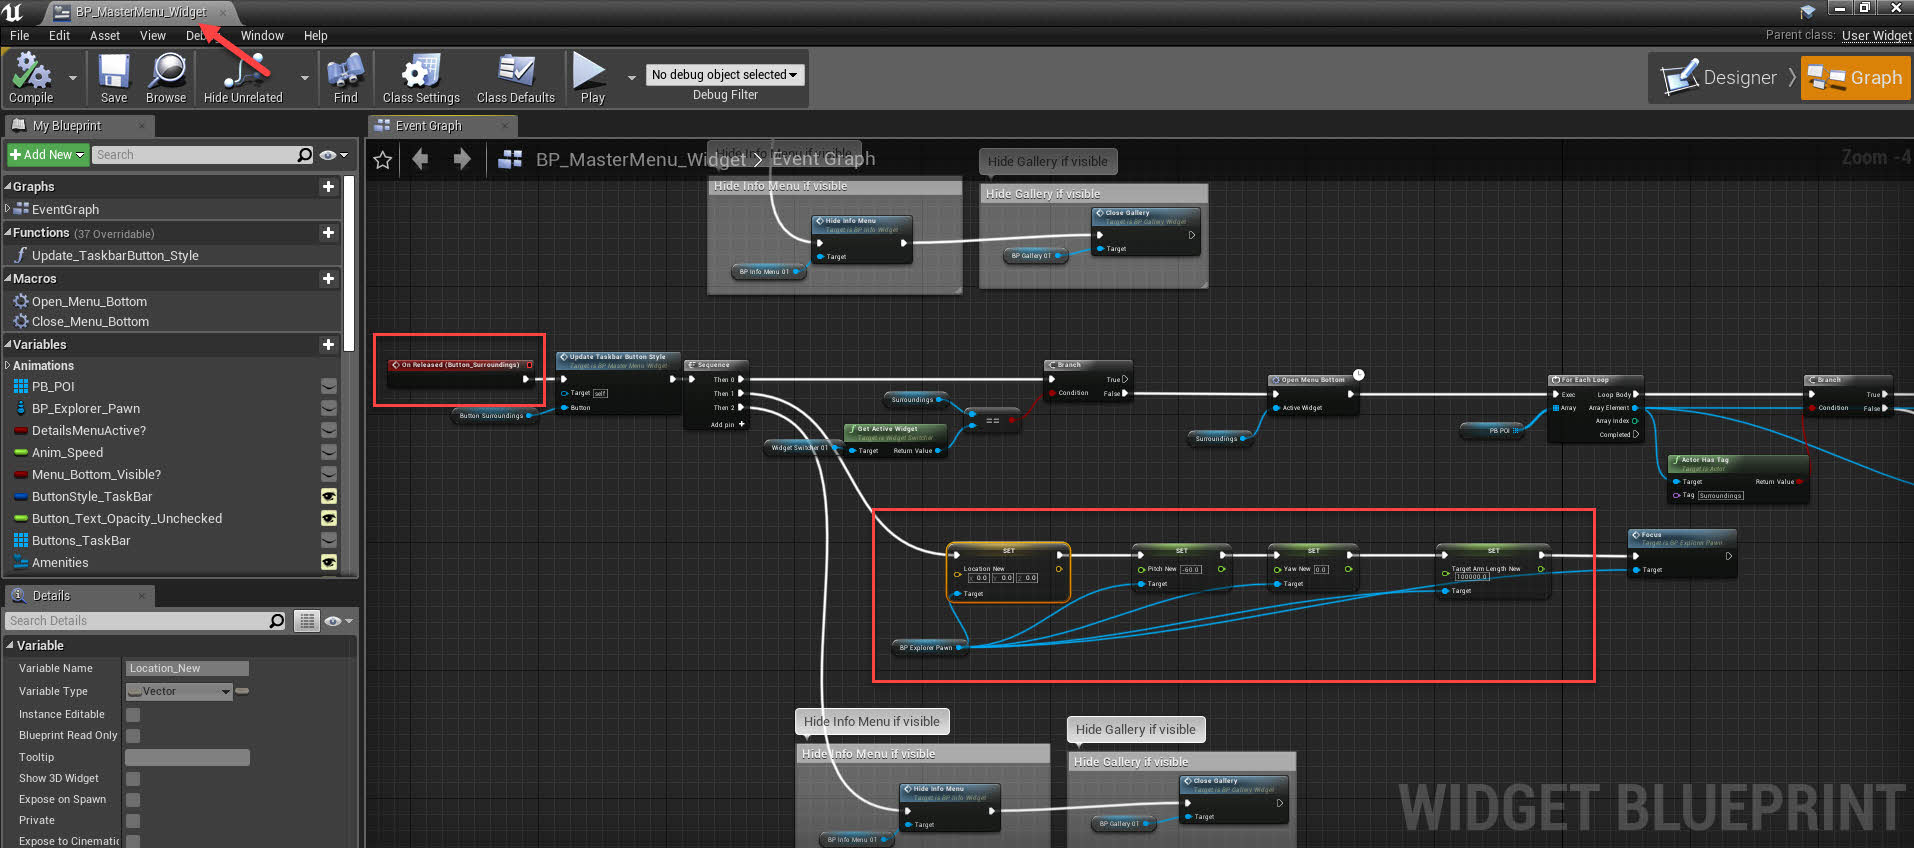
Yes, you should have at least a basic understanding of Blueprints in order to use ArchViz Explorer properly.

You will need to use a 3rd party software in order to create a city environment

Here are the options we like the most:

  • TerraForm is a great tool for users who are more experienced with Digital Elevation Models (DEMs).  It is the most flexible way but it is more labor intensive. Fortunately, TerraForm is providing an excellent Tutorial which goes through the whole pipeline.
  • Cesium for Unreal is new plugin which generates an environment based on real-world 3D data within minutes.
  • This tutorial by Mohamed Sallam is demonstrating two different methods to create a city environment for Twinmotion. The same workflows can be used for Unreal Engine 4.
  1. Open BP_MasterMenu and switch to Designer Mode
  2. From the Hierarchy Menu (left panel), select BP_MasterMenu
  3. Change ButtonStyle_TaskBar under Default (right panel)
  1. Select the BP_Explorer_Pawn actor in your scene
  2. Move and rotate the actor by using the gizmo. Please make sure that the gizmo coordinate system is set to world space when rotating on the Z-axis
  3. Select the SpringArm Component and change the Target Arm Length


  1. Open BP_MasterMenu_Widget
  2. Find the On Released Event for the specific button and change the values as shown in the image below


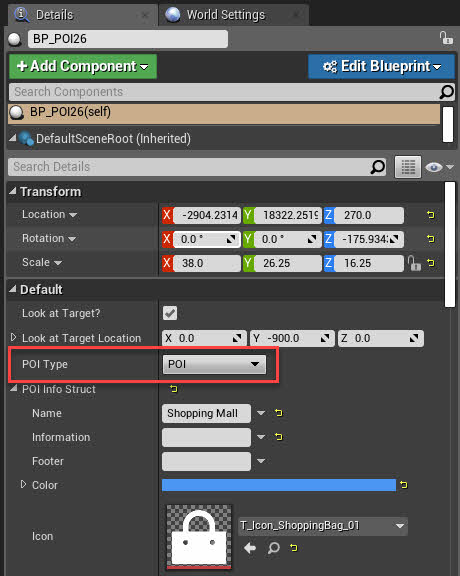
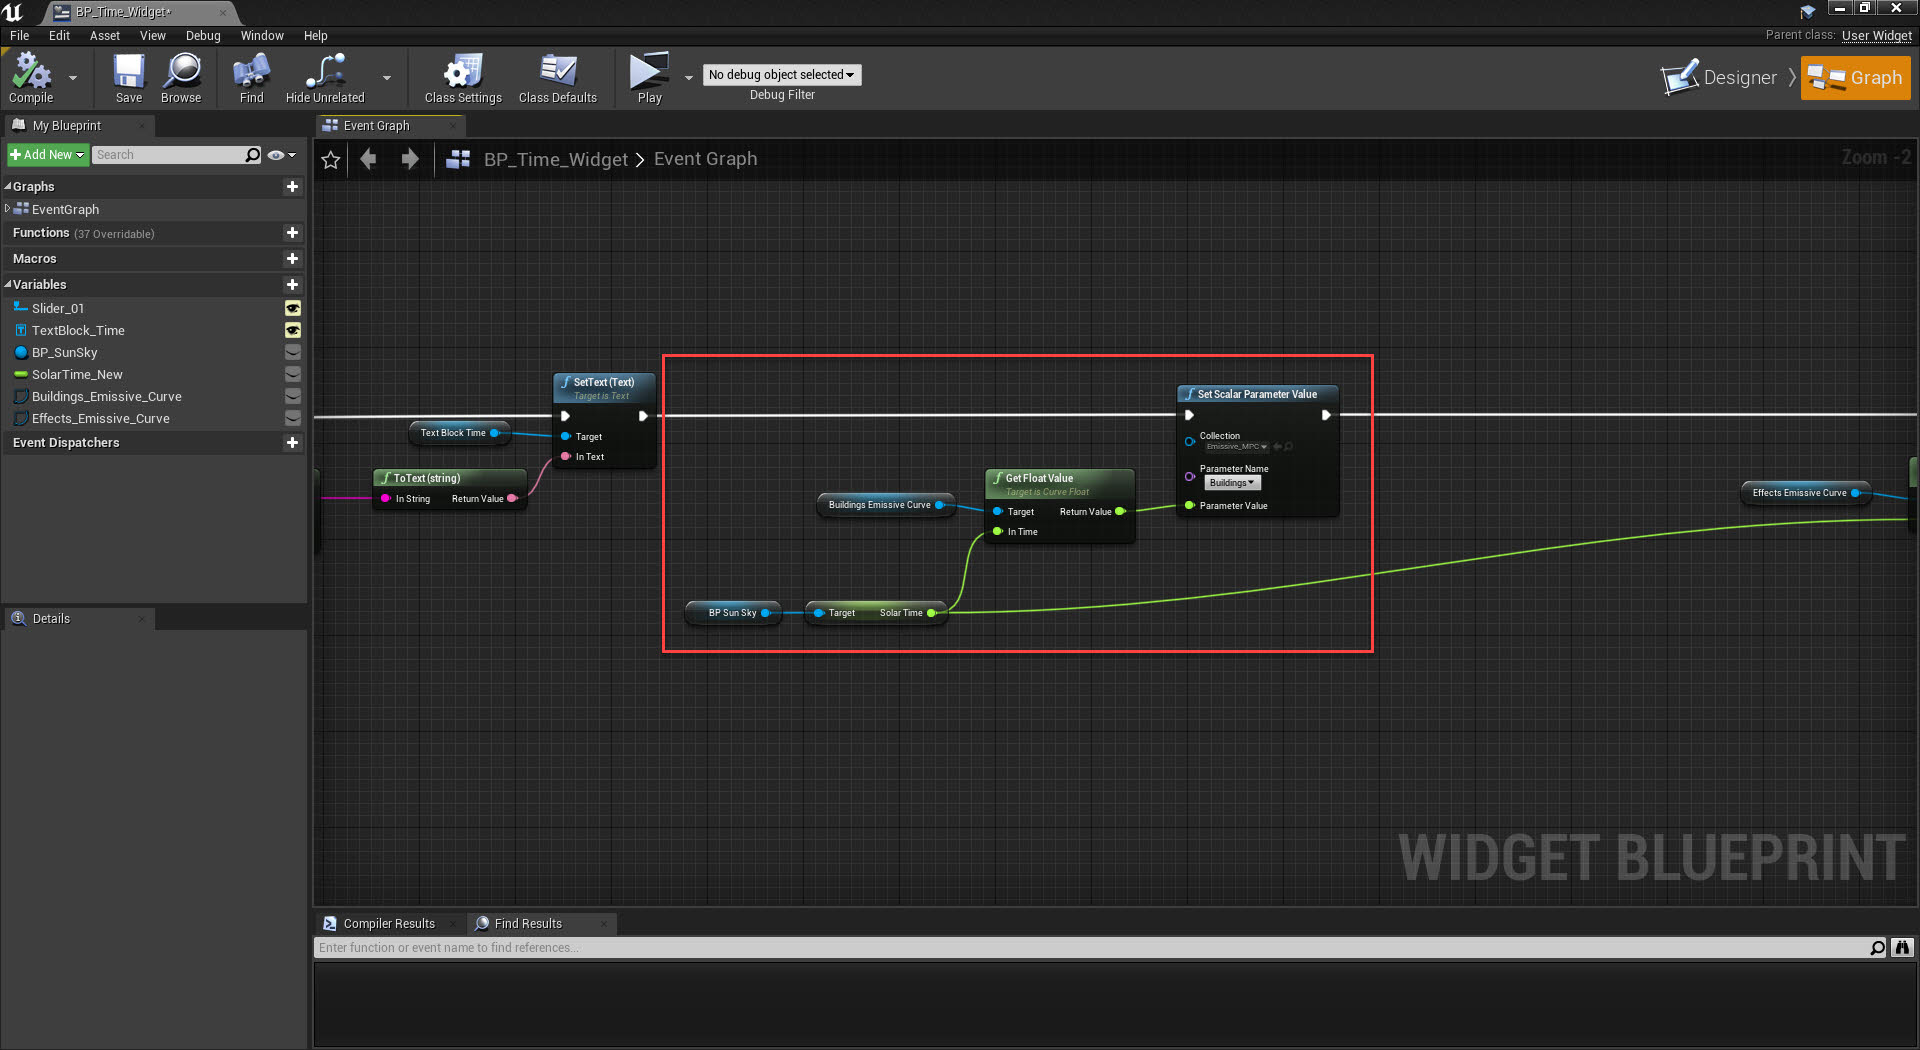
The direction from a BP_POI actor to its LookAt_Target_Location, gives you the camera yaw rotation. Therefore, changing the LookAt_Target_Location will change the yaw rotation accordingly.
 

  1. Click on the POI actor.
  2. From Details > Focus Settings > Look at  Target Location, change the X and Y values.
  3. To disable camera yaw rotation just uncheck the Change Yaw? option.

You can freely change the color of individual POI actors unless their POI Type is set to POI Filter. The color for those type of POI actors is set according to their Availability status.

For POI actors with the POI Type: POI, POI_Center;

  1. Click on the POI actor.
  2. From the Details menu, open Default > POI Info Struct.
  3. Click Color and select the desired color.


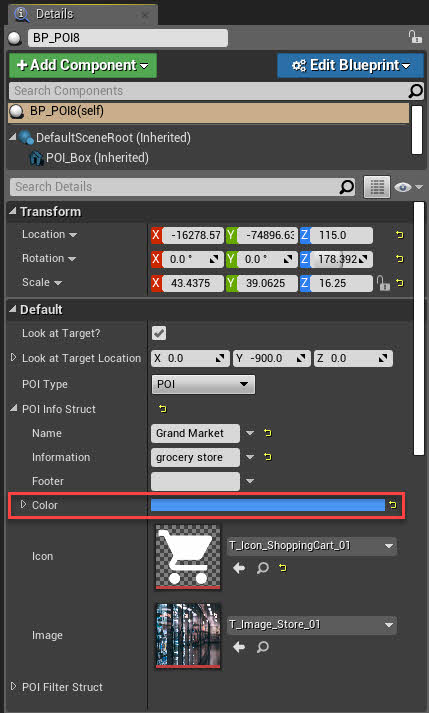
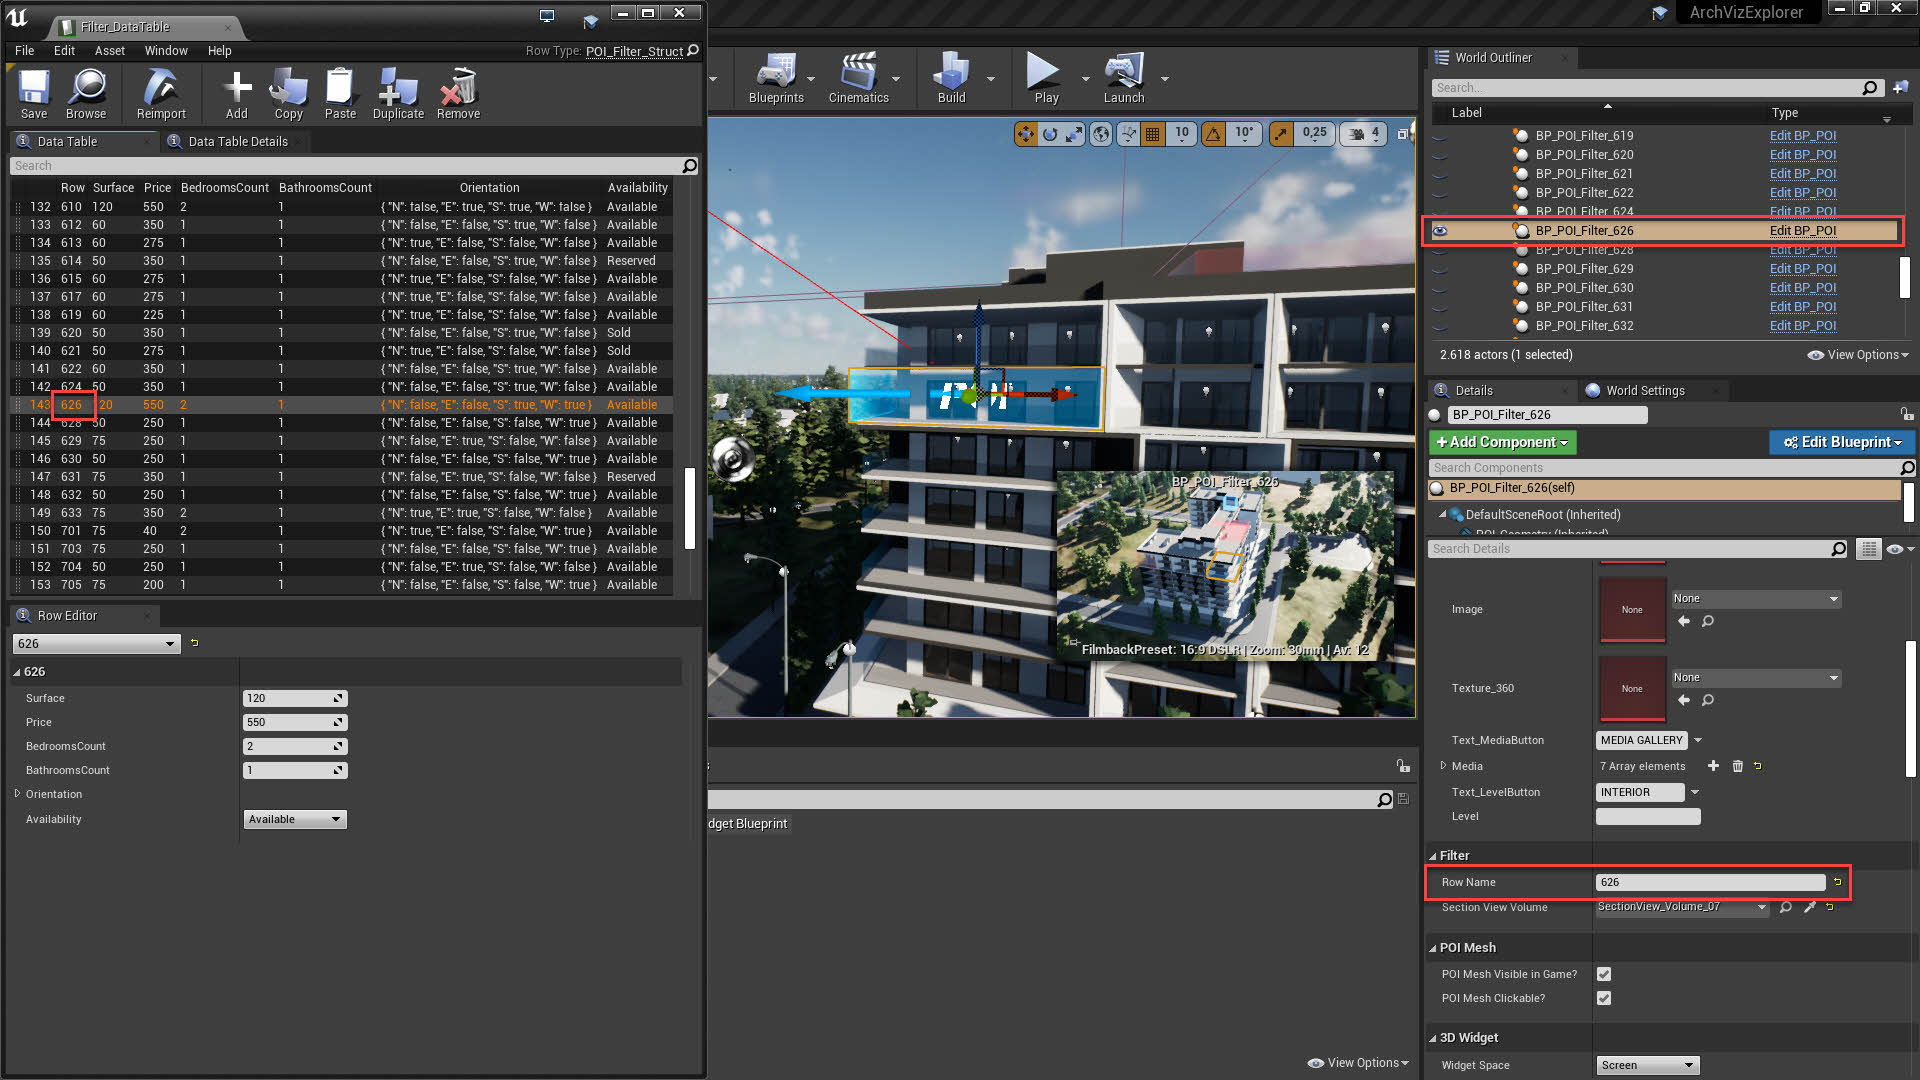
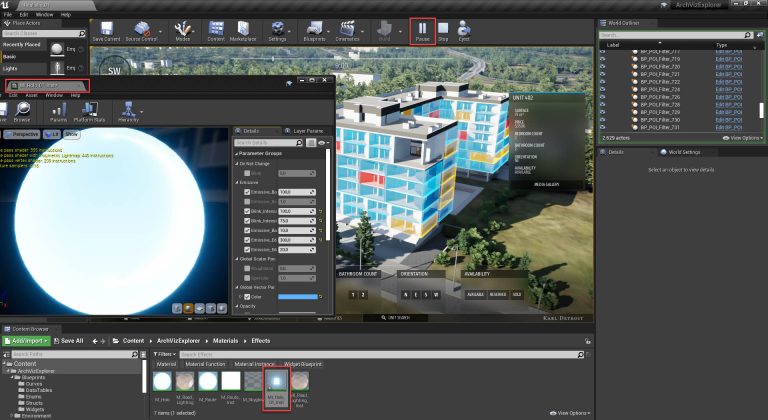
For POI actors with the POI Type: POI_Filter;

  1. Open the Construction Script of BP_POI.
  2. Find the Select function from the Image below and change its colors.


Introduction

Welcome to the ArchViz Explorer Documentation. This page is designed to give you an overview of various elements inside the project. We will make adjustments to the documentation page based on the feedback we receive. Feel free to write us your questions and suggestions: [email protected]

Getting Started

In the following video you will learn how to set up a new ArchViz Explorer project and how to migrate it into an existing project.

Adding the Realistic Expansion

The landscape and HDR images are not included in the main project. The reason is that the UE4 Marketplace policy is prohibiting free third party content that requires attribution. 

But DO NOT WORRY! You just have to download the following file and paste the new Content folder into your ArchVizExplorer project folder.

Please don’t forget to read the licensing for the additional content and to give appropriate credit!

Licensing for ArchViz Explorer Realistic Expansion: 

Migration

ArchViz Explorer comes as a “complete project” and is therefore intended to be used as a base template that users can build upon.
We would recommend migrating your existing project to a new ArchViz Explorer project, in case your project is containing little or no blueprints.

If you still want to migrate the features of Archviz Explorer into an existing project, you need to do the following.

  1. Make a backup of your existing project.
  2. Download and create a new ArchViz Explorer project inside the Epic Games Launcher.
  3. In the editors Content Browser, click ArchVizExplorer > Maps.
  4. Right-click on the map named Demonstration, click Asset Actions > Migrate.
  5. Navigate to your project’s content folder and click Select Folder. You should now see the ArchVizExplorer folder inside of your project’s content folder.

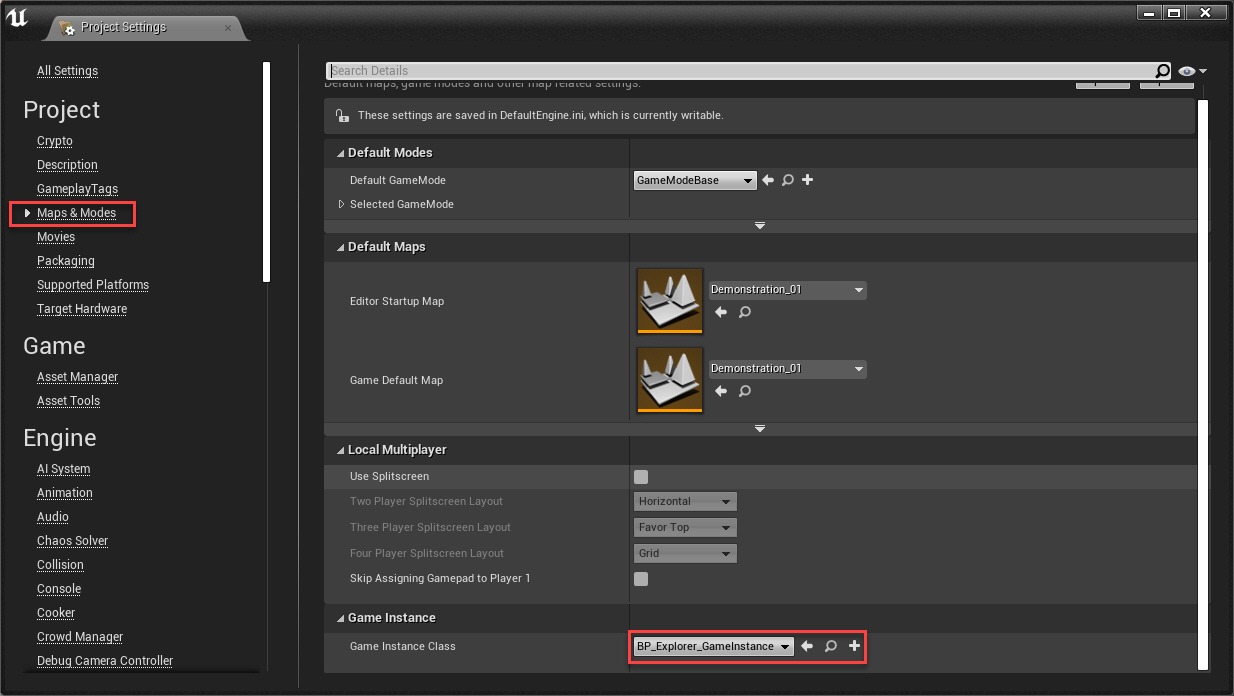
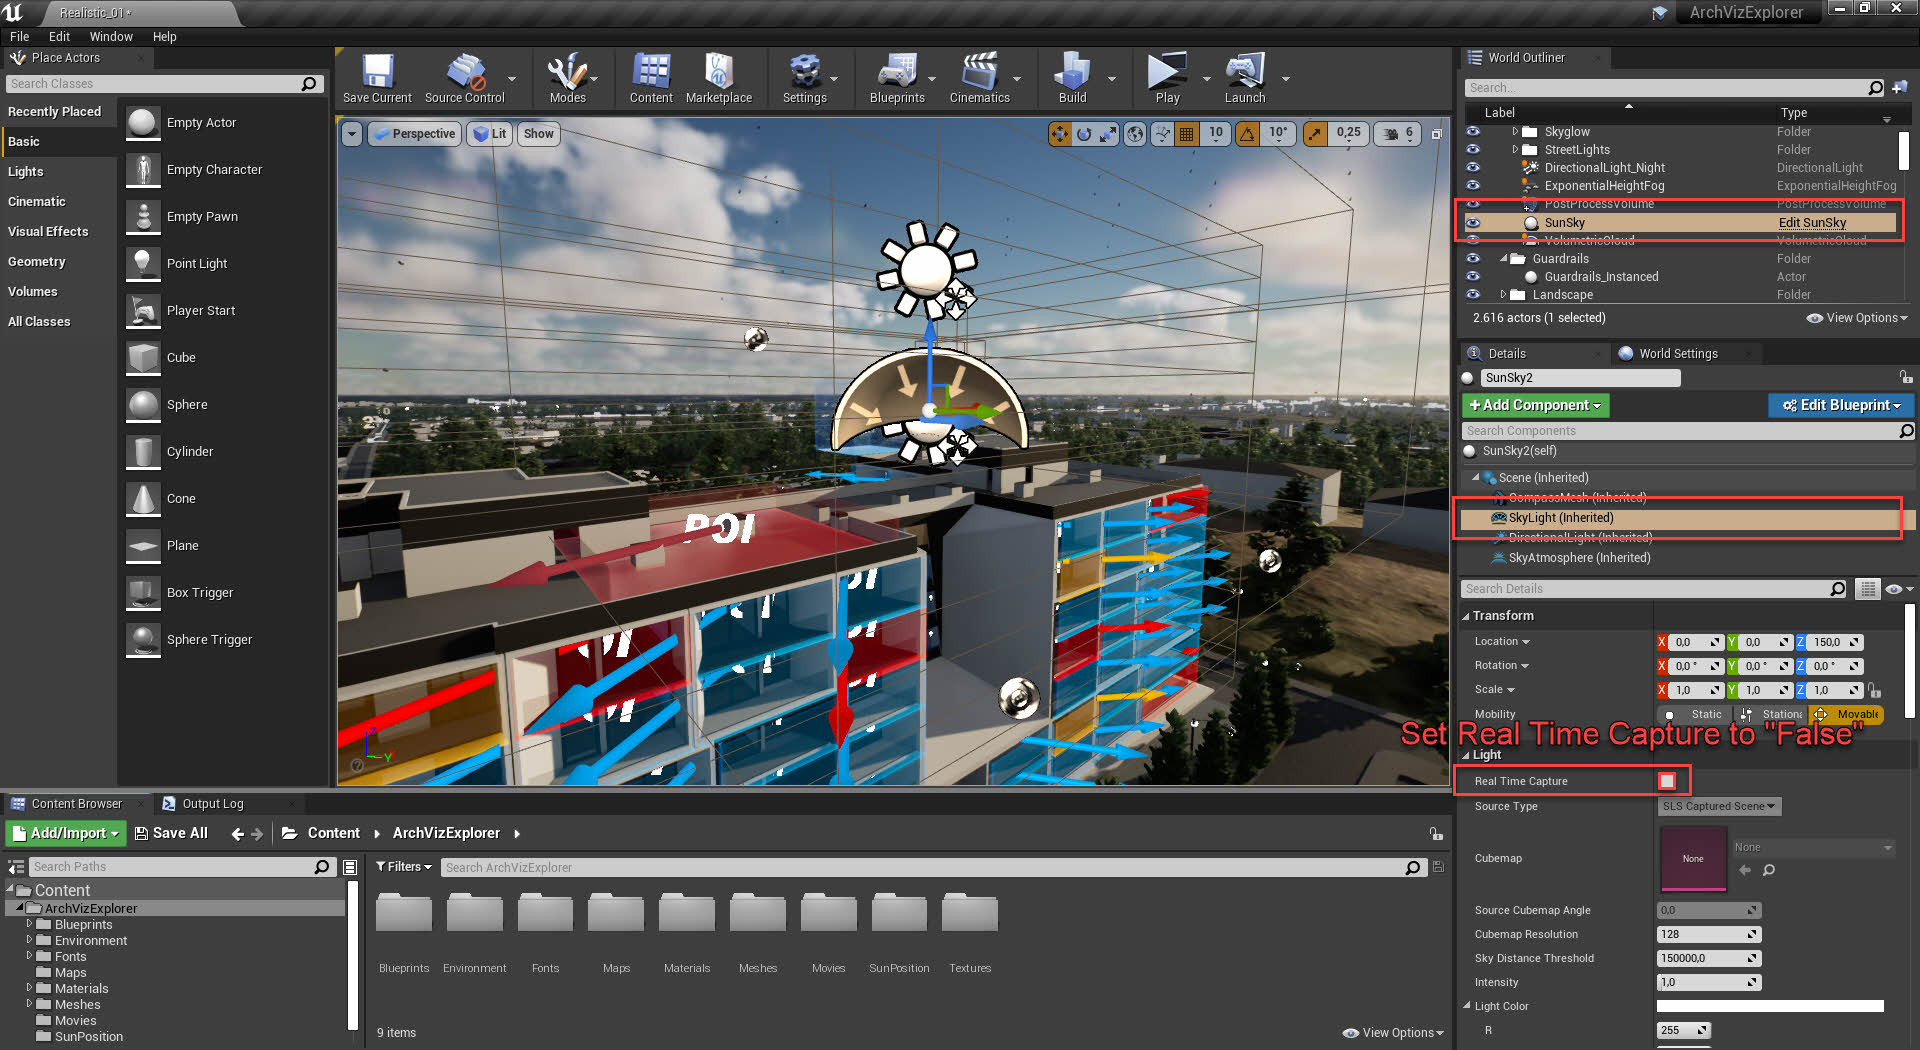
After completing the migration you will have to do some changes in your Project Settings.

  1. Ensure that Generate Mesh Distance Fields is enabled. Project Settings > Engine > Rendering > Lighting.
  2. Assign BP_Explorer_GameInstance. (Only required for v1.6 and above.)
    Project Settings > Maps & Modes > Game Instance.


  3. Enable extended luminance range of Auto Exposure. Project Settings > Rendering > Default Settings

Overview

BP_Explorer_PC (Player Controller)

The Explorer Player Controller handles following tasks:

  • Switches between pawns.
  • Draws (Add to Viewport) and stores the main menus.
  • Updates the Section View Volume
  • Checks if the mouse cursor has moved. (Is used by the Explorer Pawn to reset the camera idle.) 


Note: You can find the options for Show Mouse Cursor, Enable Click/Touch Events inside the Class Defaults of the Player Controller

BP_POI

A Point of interest (POI) is made of a colored 3D geometry, a Widget Component (label), a camera (attached to a spring arm) and an arrow. 

Depending on the POI Type, it can contain all the information you want to display on the Info Widget.

The camera, together with the arrow in the center, are showing you the direction which the camera will take, once you focus at that specific POI.

BP_Explorer_Pawn

The Explorer Pawn is calculating the camera movements (location, rotation and zoom) based on the input it gets from the mouse, touch screen and keyboard. It also contains the Focus Event which does the camera transition between POI’s and predefined locations.

BP_Explorer_GameInstance (v1.6 and above)

The Explorer Game Instance is like a container that holds the references of the POI’s, as well a reference of the currently selected POI. 
It won’t get destroyed when changing levels and can therefore be used to pass informations to an interior scene.

Data Table (v1.9 and above)

With Update v1.9 unit informations are now stored inside a Data Table. This allows larger projects to be managed more efficiently. Also, with the use of a third party CSV/Data Table plugin, clients can change the unit informations whenever they want.

Creating POI Actors

The most convenient way to create a BP_POI actor is by creating a copy of an existing one and customize it afterward. Once you placed a BP_POI actor into your level, you have to assign it a role by selecting its POI Type under Details Menu > Default.

There are currently three POI Types to choose from.

POI

Is automatically categorized and listed in the UI based on its actor tags.

Make sure that your POI actor has been assigned with valid tags for its category and subcategory! Otherwise, it won’t be visible during play.

  • Predefined categories: Surroundings, Amenities 
  • Predefined subcategories for Surroundings: Dining, Shopping, Entertainment, Education, Transportation
  • Predefined subcategories for Amenities: Leisure, Fitness, Transportation

POI_Center

Is used to mark the main object of your project and Is using BP_3D_Center_Widget for its 3D label. Make sure that the POI actor has been assigned with a valid tag (e.g. Surroundings)! 

POI_Filter

In order to create a POI which can be filtered by criteria, switch the POI_Type under Default to POI_Filter
Those type of POI’s are only visible when inside of the Unit Search menu and don’t require any actor tags!

To assign the the unit information values to your POI, you will need to match Filter > Row Name with the row name of your Data Table.

Note: You can create your Data Table inside Google Sheets or Microsoft Excel and import it into Unreal Engine.

Changing POI Focus Angle and Distance

If you want the camera to change its orientation and distance after selecting a POI, you will have to do the following: 

  1. Select the desired POI
  2. Go to Details > Focus Settings
  3. Enable Change Pitch?, Change Yaw?, Change Distance?


There are two ways to set the focus orientation of the POI.
You can either set it from the Look at Target coordinates or from the gizmo of the POI Spring Arm Component. Set Use Look at Target? to False if you decide to use the second option.

Adjusting POI Geometry Material

You might want to adjust the material of your POI geometry, especially if you modified the lighting in your scene. (Remember that emissive intensity is changing depending on the time of day.)  

You can find the POI geometry material under ArchVizExplorer > Materials > Effects > MI_Holo_01_Inst (Parent: M_Holo)

Note: The most convenient way to adjust the emissive intensities to the time of day is during the Play Mode.

Creating Routes

User Interface

Adding Media to the Main Gallery

You can add media content to your Main Gallery in the following way: 

  1. from the Content Browser, open BP_MasterMenu_Widget. 
  2. Under Hierarchy select BP_MainGallery_Widget.
  3. Add new elements under Details > Default > Media and set their content.

Adding Media to Info Widgets

If you want to add media content to your POI actors Info Widget, follow these steps : 

  1. Select a POI actor of your choice.
  2. Add new elements under Details > Default > POI_Info_Struct > Media and set their content. Please note that the Gallery Button of the Info Widget will not be visible, if your POI actor should have no elements inside its Media.

Creating Subcategories

Sorting Elements by Name

If you want to sort the elements inside of your lists alphabetically, you will have to do the following:

  1. Enable the Low Entry – Extended Standard Library Plugin from Settings > Plugins and restart the project.
  2. Open BP_EntryList_Widget from the content browser.
  3. Create a new function (Sort).

4. Go to the Event Graph and add the function Sort (Object Array).
5.
Attach it to the newly created Sort function by using the pin from the Comparator

Section View

The Section View effect is a complex system which is compiled from the following elements: 

  • MF_SectionMask
  • SectionMask_MPC
  • BP_UnitSearch_Widget
  • BP_Explorer_Pawn
  • SectionView_Volume/SectionView_Initial_Volume (TriggerVolume)
 

Each Material that should be affected by the Section View Mask must have the Material Function MF_SectionMask assigned to its Opacity Mask output. (E.g. M_Wall.)

Inside of MF_SectionMask you will find the Material Function BoxMask-3D. The Material Parameter Collection SectionMask_MPC defines the size, opacity and orientation of that BoxMask-3D.

BP_Explorer_Pawn (has been moved to BP_Explorer_PC with Update v1.9) updates these values inside of SectionMask_MPC on every tick (Event Tick) after the event Update_SectionView_Mask is called by the BP_UnitSearch_Widget. It is also possible to call the same event from different Blueprints.

The initial size and position of the mask can be set by BP_Explorer_Pawn in your scene: BP_Explorer_Pawn (Scene) > SectionView > SectionView_Initial_Volume


Environment & Lighting

Surrounding Buildings

The windows on surrounding buildings are simulated by a dynamic material and are glowing during nighttime.

  • Notice, how the emissive intensity of the mater material M_Maquette is driven by the scalar parameter Buildings of the Material Parameter Collection Emissive_MPC.


  • Depending on the time of day, BP_Time_Widget is evaluating the value of Buildings from the Float Curve Buildings_Emissive_Curve.


Sky Light - Real Time Capture Issue in UE4.26

We noticed that the Skylight in Unreal Engine 4.26 has a delay when changing the time of day. The cause of the problem is the Real Time Capture option under Details. You can bypass that problem by executing the function Recapture Sky from the SunSky Blueprint. 

  1. Select the SunSky actor and then the SkyLight component. Under Details > Light set Real Time Capture to False.


  2. Open SunSky Blueprint from the content browser and insert the following into the UpdateSun function.